
Atomic Style Side Table You Can Make at Home
Space Age Style Atomic Table with Hairpin Legs

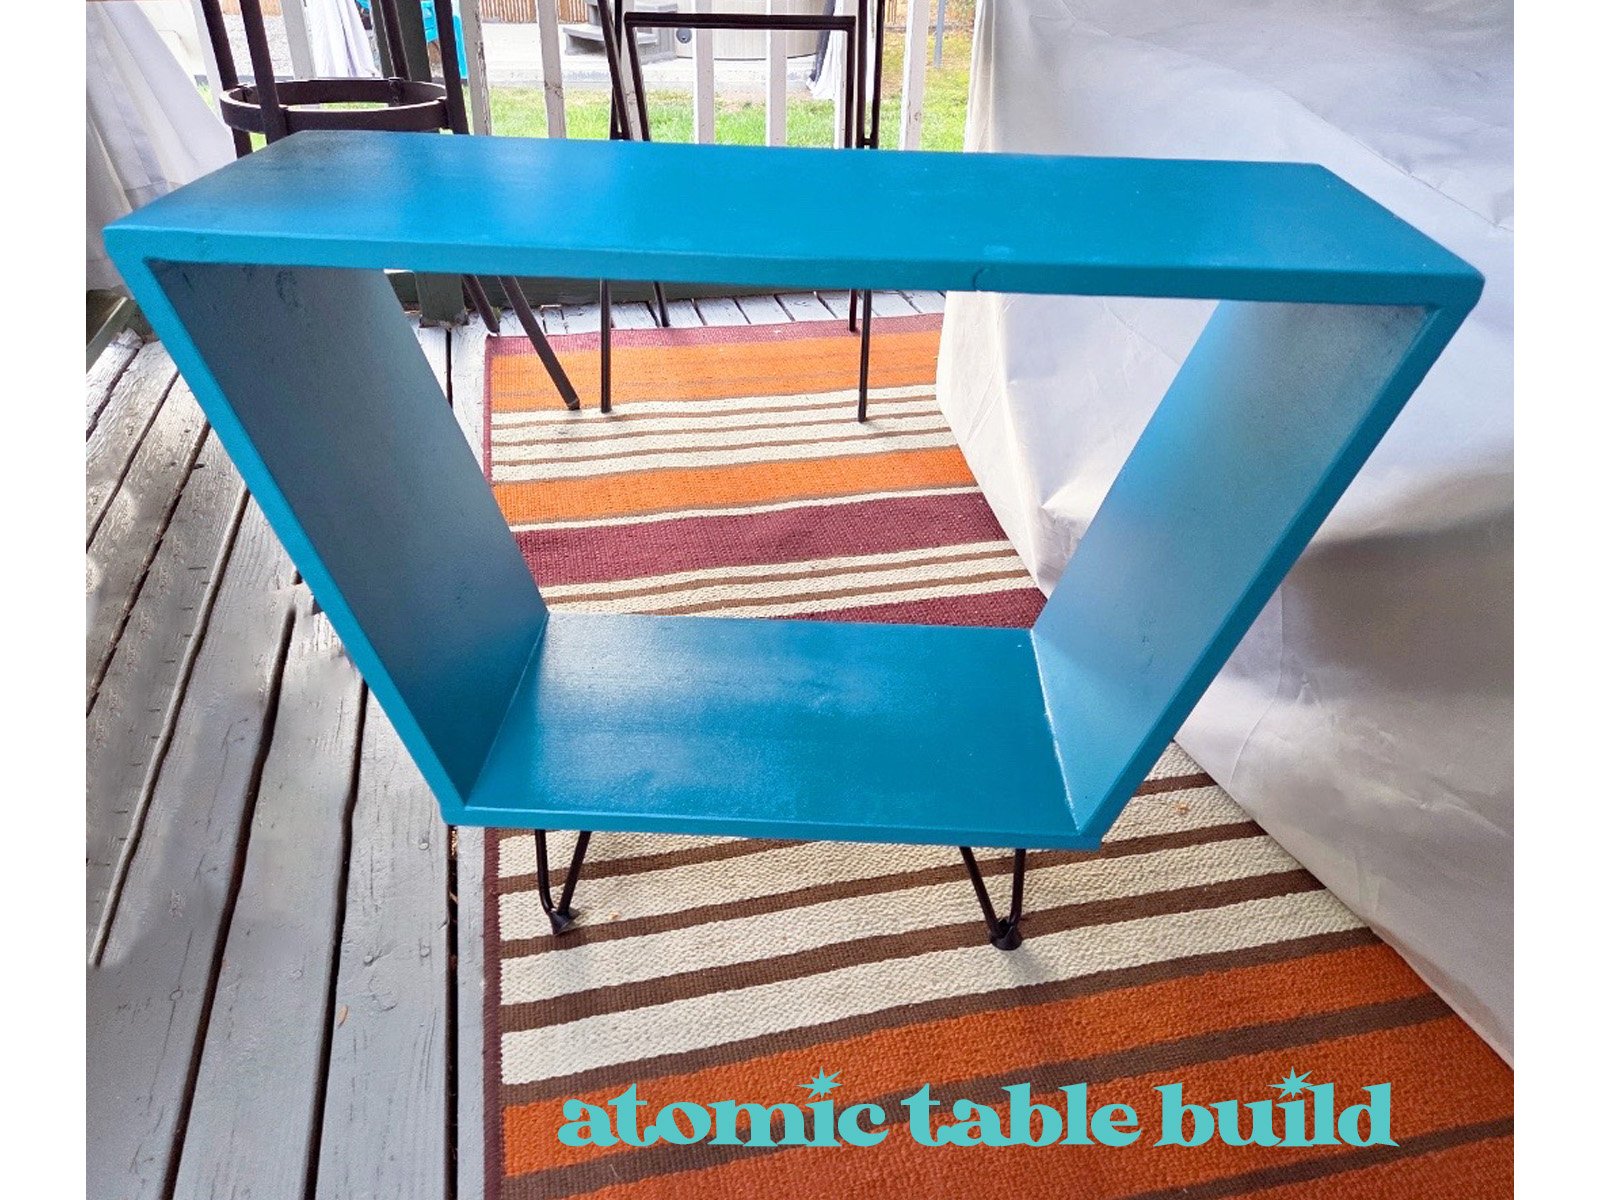
Bring a blast of mid-century charm into your home with this Space Age style atomic DIY table.
There’s something special about bringing a splash of mid-century charm into your home, especially when it doubles as a conversation piece.
This DIY atomic-style table is perfect for adding that retro wow factor to your kitchen, dining area, or patio.
I recently styled mine with a vintage inspired salad spread, complete with crisp lettuce, juicy tomato wedges, and a drizzle of creamy Green Goddess salad dressing straight out of a 1950s recipe book.
It’s proof that good design and good food are always a perfect pairing.

This blog contains affiliate links, which support the free content on this blog. As an Amazon Associates affiliate, I earn from qualifying purchases. Your clicks help support the blog.
Its bold angles, cheerful color, and sleek hairpin legs channel the 1950s fascination with futuristic design all in a DIY project that’s as fun to make as it is to style.

Index
A Brief History of Atomic Furniture
Materials & Tools You’ll Need
Cutting & Assembling the Table Frame
Painting in True Retro Style
Adding Hairpin Legs for that Atomic Touch
Retro Ways to Use Your Atomic Table in the Kitchen or Dining Area
Atomic Shopping
Final Thoughts
A Brief History of Atomic Furniture
Atomic furniture first burst onto the scene in the late 1940s and 1950s, inspired by the excitement of the Space Age, postwar optimism, and rapid advances in science and technology.
Designers embraced bold geometric shapes, boomerangs, starbursts, and sputnik-like motifs all nods to atoms, rockets, and satellites.
Popular in mid-century homes, atomic style pieces often featured angled lines, bright colors, and hairpin or tapered legs, blending playful futurism with functional simplicity.

2. Materials & Tools You’ll Need
Wood boards or plywood cut to size.
Drill, screwdriver.
Paint (turquoise, coral, mustard, or teal for authenticity).
Brad-nail gun (or standard hammer & nails)
Sandpaper (medium and fine grit)
Wood filler (optional, for pinholes or gaps)
Paintbrushes or rollers.
Wood glue, clamps.

3. Cutting & Assembling the Table Frame
Top Board: 11" x 30"
Bottom Board: 19 ½" x 11"
Side Boards: 17" x 11"
Cut the Angles:
Cut both side boards at a 20° angle on the top and bottom edges.
These angled ends will allow the side boards to fit neatly against the inside edges of the top and bottom boards, creating that classic atomic silhouette.
Prepare the Internal Braces
Using your off-cuts, cut 4 small pieces at the same 20° angle. Stack them into pairs to form two sturdy braces for glue-up.These will help hold everything in place during glue-up.
Assembly:
Attach the side boards to the inside edges of the top and bottom boards, using the braces to keep the angles steady while the glue sets.
Once dry, remove the braces and admire your perfectly angled atomic frame ready for legs, paint, and plenty of retro charm.


4. Painting in True Retro Style
Prep sand and prime
Recommended paint colors for an authentic 1950s–1960s feel. Chart below
Used wood filler and sanded to fill in any pinholes and gaps


🎨 Vintage Paint Palette Inspiration
Bring your atomic table to life with colors straight from the 1950s–1960s!
Warm, cheerful, and perfect with brass or gold accents.
#F26A5A
Bright and happy—adds instant kitchen sunshine.
#FFD95A
Cool, anchoring, and timeless with atomic shapes.
#118C8B
5. Adding Hairpin Legs for That Atomic Touch
Positioning: Place each hairpin leg 1 inch in from the sides to give your table a balanced, professional look.
Choosing the Height: Select a leg height that matches your table’s purpose shorter for a cocktail table, taller for a side or entry table.
Optional Protection: Add felt or rubber pads to the bottoms of the legs to protect your floors and keep your table from sliding.

6. Retro Ways to Use Your Atomic Table in the Kitchen or Dining Area
Cocktail Corner:
Style it with a vintage bar tray, cocktail shaker, and a few mid-century glass tumblers for an instant retro bar cart alternative.
Coffee & Pastry Station:
Perfect for hosting brunch set out a percolator, a cake stand with pastries, and colorful Melmac plates.
Dessert Display:
Use it as a charming dessert station for pies, cakes, and Jell-O molds during parties.
Vintage Beverage Stand:
Serve lemonade, iced tea, or punch in a retro glass drink dispenser with matching cups.
Snack & Appetizer Hub:
Arrange deviled eggs, cheese fondue, or relish trays for a mid-century cocktail party.
Baking Prep Table:
Keep your stand mixer, mixing bowls, and recipe cards handy while you bake.
Seasonal Display:
Dress it up with themed dishes like a hot cocoa station in winter or a strawberry shortcake spread in summer.


♥ Celebrate Retro Style ♥Add a dash of humor to your kitchen with this retro-inspired 8x10 printable retro wall art! Featuring a cheerful mid-century homemaker proudly serving smiles… and store-bought pie crust, this instant download is perfect for bakers, vintage lovers, and anyone who knows that shortcuts still count when served with style. Designed with a built-in white border for easy framing just print, pop it in a frame.
What You’ll Receive:
A ZIP file containing:
• 1 PDF (8x10)
• 1 JPEG (8x10)Print at home, a local print shop, or your favorite online printer
Details:
Size: 8x10 inches
Format: Instant digital download (no physical item shipped)
Style: Mid-century retro, funny vintage humor
Frame not included
Cart Tip: Click the shopping cart icon at the top right side of this page to view your cart when checking out!
⚠️ Important Notes
This is a digital download. No physical item will be shipped.
Colors may vary slightly depending on your screen and printer settings.
✨ Secure Checkout - powered by Squarespace + trusted payment options
Portions of this artwork may include AI-assisted elements that were modified, edited, and incorporated into an original Vintage by the Bite design.No returns on digital products
7. Final Thoughts
This blog isn’t just about building a table it’s about building a vibe.
Show off your atomic masterpiece! ✨ Once your table is built and ready for its closeup, share a photo in the comments or tag me on social media with #AtomicStyleTable.

